

I always promised to show others how I make the things I do so I will share with you how I made this headboard .
I was so thrilled to be asked to make a custom headboard recently, after years of making things for myself , I am now confident in my skills to be offering them to others , what an opportunity I have been given .
After narrowing down the desired style, well actually coming up with a combination of the top left and the bottom right to make the perfect combination of button tufting and nailhead trim, I went to work , the first stop was the lumber section to purchase a sheet of plywood , I went with 5/8" to make sure it could handle the wear and staples . Sophie went with me on this trip and spied a "mickey mouse" hiding in the wood , that was a good sign .
 Then it was off the upholstery supply store for foam , let me warn you now , FOAM IS EXPENSIVE ! I went with medium density 2" foam, to create a most luxe result. This one sheet was over $100.00 dollars.
 I then mapped out a grid of equally space lines using a level , then I drew out the curved edges until I got the desired look , I then used painters tape to make the line easy to see through a sheet of paper , I then traced the shape onto white paper . I then used that piece of paper to copy the shape to the other square edge of the plywood creating a mirror image cut line .
 I used a jig saw to cut the plywood.
 I had the basic shape now to cut my foam . I cut the foam to fit { I used a large pair of scissors and a sharp blade nothing special}, not larger than the wood. I then recut the top edge back about a 1/4" to allow for the nail head trim {it would not have been able to grip the wood if I didn't do this}
Then I added a sheet of upholstery batting cut two inches wider than the board and stapled it into place , making sure nothing shifted around.
 On to the fabric , the trick to this is patience , tacking tightly one staple in the middle of each side , then working your way out from the mid point staples , this ensures a smooth and even attachment.

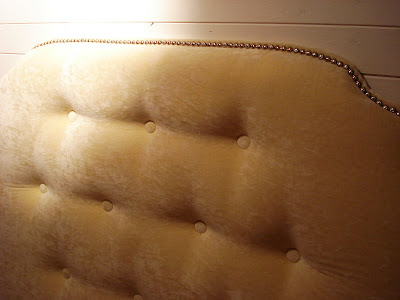
Next was adding the nails , these strips made the job much easier , got those at LeeValley Tools .

I then spaced out the button locations marking them with pins , then removing the pins and using a awl to hammer a hole all the way through to the back and through the wood , allowing a hole to push the button rod through , this is a two person job one pushing it through another prying the metal pieces apart and hammering them down , I then stapled them into place . I then covered the back with an upholstery covering to finish the headboard from front to back.

We dropped off and installed the headboard today using some fantastic clips , I somehow forgot my camera , I was thrilled with the end result , it looked perfect for the room .
 On to the fabric , the trick to this is patience , tacking tightly one staple in the middle of each side , then working your way out from the mid point staples , this ensures a smooth and even attachment.
Next was adding the nails , these strips made the job much easier , got those at LeeValley Tools .

I then spaced out the button locations marking them with pins , then removing the pins and using a awl to hammer a hole all the way through to the back and through the wood , allowing a hole to push the button rod through , this is a two person job one pushing it through another prying the metal pieces apart and hammering them down , I then stapled them into place . I then covered the back with an upholstery covering to finish the headboard from front to back.


We dropped off and installed the headboard today using some fantastic clips , I somehow forgot my camera , I was thrilled with the end result , it looked perfect for the room .
Thank you for letting me try my hand at headboard making Ellen , it was my pleasure . I can't wait to see the pictures.